How to Make Sourdough Bread at Home: Your Ultimate Guide
July 12, 2026 15 min read 3,057 words
Transform your kitchen into a bakery and master the art of sourdough with our expert-led, easy-to-follow instructions.
Start Baking Today!
Understanding the Sourdough Starter: Your Living Leavening Agent
 Photo: Lidya Kohen / Pexels
Before you can truly master how to make sourdough bread at home, you must first understand its heart and soul: the sourdough starter. This seemingly simple mixture of flour and water is, in fact, a thriving ecosystem of wild yeasts and lactobacilli. These microorganisms are responsible for the distinctive sour flavor, the incredible rise, and the unique texture of sourdough bread. Without a healthy, active starter, your sourdough journey won't get off the ground.
Creating your own starter is a rewarding process, though it requires patience. It typically takes about 5-7 days to establish a robust starter from scratch. You'll combine equal parts flour (usually whole wheat or rye to kickstart microbial activity, then all-purpose or bread flour for maintenance) and water in a jar. Each day, you'll 'feed' it by discarding a portion and adding fresh flour and water. This regular feeding cycles out spent nutrients and introduces new ones, encouraging the beneficial microbes to multiply. You'll start to notice bubbles forming, a pleasant tangy aroma, and the mixture growing in volume after feeding – all signs of a healthy, active starter. Once it reliably doubles or triples in size within 4-8 hours of feeding, it's ready to bake with.
Maintaining your starter is just as crucial as creating it. If you bake frequently, you can keep it on your counter, feeding it once or twice a day. For less frequent bakers, storing it in the refrigerator slows down its metabolism, requiring feeds only once a week or so. Remember to take it out and feed it 12-24 hours before you plan to bake to ensure it's vigorous and ready to work its magic. A strong starter is the foundation of amazing sourdough, providing consistent leavening and contributing immensely to the bread's flavor profile. Think of it as a pet that needs regular care and attention, and in return, it will provide you with endless loaves of delicious bread. Learning to read your starter – its smell, its texture, its activity – is one of the most important skills you'll develop on your path to becoming a sourdough baker. For more tips on maintaining a healthy starter, check out our guide on
sourdough starter care.
The type of flour you use for your starter can also influence its characteristics. While all-purpose flour works, many bakers prefer bread flour for its higher protein content, which can contribute to a stronger gluten network in your starter and, consequently, your bread. Whole grain flours, such as rye or whole wheat, are often used to initiate a starter because they contain more wild yeasts and nutrients, making them ideal for kickstarting fermentation. Once established, you can transition to feeding with the same flour you plan to use for your bread. This consistency helps ensure your starter is perfectly attuned to the dough you'll be making. The consistency of your starter also matters; it should be like a thick pancake batter, not too stiff and not too runny. Adjust water or flour slightly if needed during feeding to achieve this ideal consistency. This careful attention to your starter's health and activity is paramount for anyone serious about learning how to make sourdough bread at home.
The Art of Mixing and Fermentation: Building Flavor and Structure
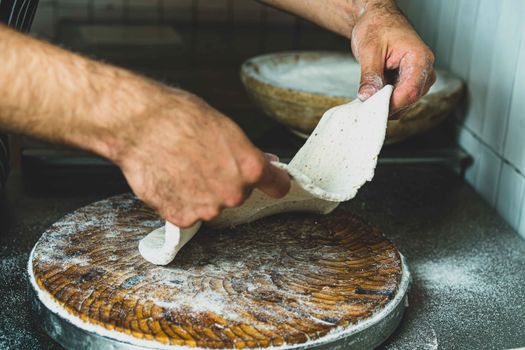 Photo: Anat Landa / Pexels
Once your sourdough starter is active and ready, the real magic of how to make sourdough bread at home begins with the mixing and fermentation stages. These steps are where the dough develops its structure, strength, and that signature complex flavor. It starts with the autolyse: a simple yet powerful technique where you combine just the flour and water from your recipe and let it rest for 30 minutes to an hour. This resting period allows the flour to fully hydrate, activating enzymes that begin to break down proteins, which in turn helps in gluten development. It also makes the dough more extensible and easier to work with later on, reducing the need for excessive kneading.
After the autolyse, it's time to incorporate your active starter and salt. The starter is gently mixed in, ensuring it's evenly distributed throughout the dough. Salt, while often seen as just a flavor enhancer, also plays a crucial role in regulating fermentation and strengthening the gluten network. Once everything is combined, the bulk fermentation (or first rise) begins. This is a critical period, typically lasting 3-6 hours at room temperature, where the wild yeasts consume sugars and produce carbon dioxide, causing the dough to rise, and the lactobacilli produce lactic and acetic acids, contributing to the sourdough's characteristic tang.
During bulk fermentation, you'll perform a series of 'stretch and folds' every 30-60 minutes for the first 2-3 hours. This technique involves gently stretching a portion of the dough up and folding it over itself, then rotating the bowl and repeating. These folds are less about kneading and more about building strength and structure in the dough without deflating the precious gas bubbles. They help align the gluten strands, creating a robust network that can trap the gases produced during fermentation, leading to a light and airy crumb. As you perform these folds, you'll notice the dough transforming from a shaggy, loose mass into a smooth, elastic, and strong structure. The number of folds and the duration of bulk fermentation can vary based on your starter's activity, the ambient temperature, and the specific flour used. Learning to read your dough – feeling its resistance, observing its rise, and noting its texture – is key to successful sourdough baking. It's an intuitive process that improves with practice and observation, guiding you to know when your dough has reached its optimal development before moving to the next stage.
Shaping, Proofing, and Baking: The Grand Finale of Your Sourdough Journey
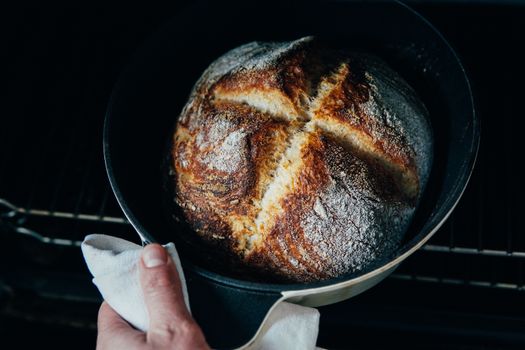 Photo: Elle Hughes / Pexels
Having nurtured your starter and developed your dough's strength and flavor through careful mixing and fermentation, you're now at the exhilarating final stages of how to make sourdough bread at home: shaping, proofing, and baking. These steps are where your hard work culminates into that beautiful, crusty loaf you've been dreaming of. Shaping is crucial for giving your bread its final form and building surface tension, which helps the loaf hold its structure during baking and encourages a good oven spring.
After bulk fermentation, gently turn your dough out onto a lightly floured surface. Avoid aggressive handling, as you want to preserve the gas pockets that have formed. For a round loaf (boule), you’ll gently preshape the dough into a loose ball, allowing it to rest for 20-30 minutes. This 'bench rest' relaxes the gluten, making the final shaping easier. Then, you'll perform the final shaping, tightening the dough into a taut ball or oblong (batard) by pulling and folding the edges towards the center, then flipping it seam-side down and gently rotating it to create surface tension. This tension is vital for a good rise and an attractive crust.
Once shaped, the dough goes into a proofing basket, often called a banneton, which is typically dusted with rice flour to prevent sticking. This basket helps the dough maintain its shape during the final proof. Most home bakers opt for a cold proof, placing the banneton in the refrigerator for 12-24 hours. Cold proofing slows down fermentation, allowing flavors to deepen and making the dough easier to score. It also fits conveniently into a busy schedule. When you're ready to bake, preheat your oven with a Dutch oven inside to a very high temperature (around 450-500°F or 230-260°C). The Dutch oven traps steam, which keeps the crust soft initially, allowing the bread to expand fully before it sets. This steam is what gives sourdough its characteristic crackly, blistered crust.
Carefully transfer your cold dough from the banneton into the hot Dutch oven. Score the top of the dough with a sharp razor blade or lame; this controls where the bread expands and creates beautiful patterns. Bake with the lid on for the first 20-25 minutes to trap steam, then remove the lid and continue baking for another 20-30 minutes until the crust is deep golden brown and the internal temperature reaches 200-210°F (93-99°C). The sound of a hollow thump when tapping the bottom also indicates doneness. Finally, resist the urge to cut into your masterpiece immediately! Let it cool on a wire rack for at least 1-2 hours. This cooling period allows the internal structure to set and the flavors to fully develop, ensuring a perfect crumb. For more insights on achieving the perfect crust, explore our guide on
sourdough baking techniques.
Every step, from the gentle handling during shaping to the dramatic reveal of the baked loaf from the Dutch oven, is a testament to the baker's patience and skill. The precise timing of the cold proofing, for instance, can significantly impact the final texture and sourness of the bread. A longer cold proof generally leads to a more pronounced tang. Moreover, the scoring pattern isn't just for aesthetics; it directs the oven spring and can prevent uncontrolled tearing of the crust. Experimenting with different scoring techniques can be a fun way to personalize your loaves. The final bake, with the intense heat and steam, is what transforms the pale, proofed dough into a loaf with an irresistible, chewy interior and a shatteringly crisp exterior. Understanding the nuances of these final stages is what truly elevates your skill in how to make sourdough bread at home from a beginner to a seasoned artisan.
Common Sourdough Mistakes and How to Avoid Them
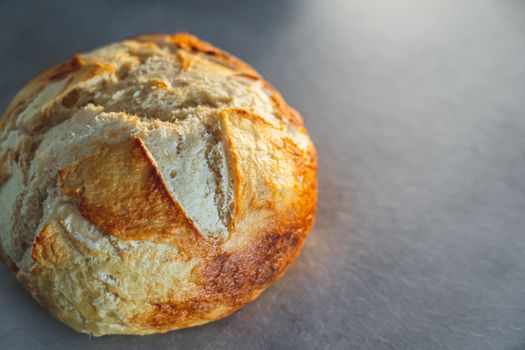 Photo: Castorly Stock / Pexels
Learning how to make sourdough bread at home can be an incredibly rewarding journey, but like any craft, it comes with its share of potential pitfalls. Understanding common mistakes and knowing how to prevent them can save you a lot of frustration and lead to consistently better loaves. Here are some of the most frequent issues new sourdough bakers encounter and expert advice on how to navigate them:
* **Weak or Inactive Starter:** This is perhaps the most common culprit behind flat, dense loaves. If your starter isn't consistently doubling or tripling in size within 4-8 hours after feeding, it's not strong enough. **Solution:** Feed your starter regularly, at least once every 12-24 hours when kept at room temperature, or once a week if refrigerated (with a few warm feeds before baking). Use a consistent feeding ratio (e.g., 1:2:2 starter:water:flour by weight) and good quality unbleached flour. Give it time to become robust.
* **Under-Proofed or Over-Proofed Dough:** Both lead to less-than-ideal results. Under-proofed dough will have a very dense crumb and may burst uncontrollably during baking. Over-proofed dough will be overly sticky, hard to shape, and collapse in the oven, resulting in a flat loaf. **Solution:** Learn to read your dough, not just the clock. Look for visual cues during bulk fermentation: the dough should be jiggly, airy, and have increased significantly in volume (typically 30-50%). For the final proof, the 'poke test' is your friend: gently poke the dough with a floured finger; if it springs back slowly, it's ready. If it springs back immediately, it's under-proofed. If the indentation remains, it's likely over-proofed.
* **Not Enough Surface Tension During Shaping:** If your loaf spreads out rather than rising up in the oven, it often means it lacked sufficient surface tension. **Solution:** Practice your shaping techniques. The goal is to create a taut skin on the outside of the dough that will hold its structure. Watch videos, experiment with different methods (boule vs. batard), and don't be afraid to be firm but gentle.
* **Insufficient Baking Temperature or Time:** A pale crust or a gummy interior often points to this issue. **Solution:** Always preheat your oven and Dutch oven thoroughly, ideally for at least 30-60 minutes at a high temperature (450-500°F). Bake with the lid on for the first portion to trap steam, then remove it to allow the crust to brown and crisp. Don't be afraid to bake until the crust is a deep golden brown and the internal temperature reaches 200-210°F.
* **Cutting Bread Too Soon:** It's tempting, but cutting into a hot loaf can lead to a gummy, doughy texture inside, even if perfectly baked. **Solution:** Patience! Allow your sourdough loaf to cool completely on a wire rack for at least 1-2 hours (or even longer for very large loaves). This allows the starches to set and the moisture to redistribute, resulting in the perfect texture and flavor.
By being aware of these common pitfalls and implementing these solutions, you'll significantly improve your chances of success when you how to make sourdough bread at home, leading to consistently delicious, artisan-quality loaves. Remember, every bake is a learning experience, and even experienced bakers have their off days. Embrace the process, learn from your mistakes, and enjoy the journey of creating something truly special with your own hands.